Posts

Showing posts from May, 2017

ARDUINO SKETCH FOR FIRE SENSOR

////USE THIS CODE FOR FIRE SENSOR FOR BETTER RESULTS...... int val ;// define numeric variables val float sensor; //read analoog value void flamesensor() {   int sensorReading = analogRead(A5);   // map the sensor range (four options):   // ex: 'long int map(long int, long int, long int, long int, long int)'  int range = map(sensorReading, sensorMin, sensorMax, 0, 3);     // range value:   switch (range) {   case 0:    // A fire closer than 1.5 feet away.     Serial.println("** Close Fire **");     Serial.println(sensorReading);     break;   case 1:    // A fire between 1-3 feet away.     Serial.println("** Distant Fire **");     Serial.println(sensorReading);     break;   case 2:    // No fire detected.     Serial.println("No Fire");     Serial.println(sensorReading);     break;   }   delay(5000);  // delay between reads }

SOFTWARE DEFINED RADIO (SDR)

Image
the sdr is a cool gadget which can simulate the functioning of a radio transceiver the sdr a built in functionalities to do more things like building your own fm/am modulation stations virutally..... the sdr is also used to hack stuff life private walkie talkies and wireless rf transmitters and more i'll be posting some of awsome links to youtube channels about the sdr and how to get started with the sdr and more once u learn how to use u can do some cool stuff with it.... here are the link for sammy kramer hacking with sdr link for ossmann sdr tutorials

ARDUINO CODE FOR PIR SENSOR

Image
int val=0; #define led 13 void setup() { Serial.begin(9600); pinMode(led,OUTPUT); } void loop() { val=digitalRead(3); if (val==HIGH){ digitalWrite(led,HIGH); Serial.println("motion is detected"); } if(val==LOW){ digitalWrite(led,LOW); delay(50); Serial.println("nothing is detected"); } }

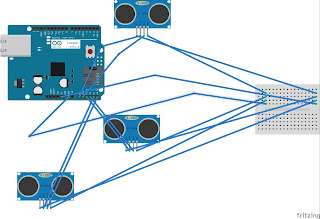
ARDUINO SKETCH FOR MULTIPLE DISTANCE SENSORS

Image
Code: #include<NewPing.h> #define TRIGGER_PIN A0 #define ECHO_PIN A1 #define TRIGGER_PIN2 A2 #define ECHO_PIN2 A3 #define TRIGGER_PIN3 A4 #define ECHO_PIN3 A5 #define TRIGGER_PIN4 7 #define ECHO_PIN4 6 #define MAX_DISTANCE 200 NewPing sonar1(TRIGGER_PIN, ECHO_PIN, MAX_DISTANCE); NewPing sonar2(TRIGGER_PIN2, ECHO_PIN2, MAX_DISTANCE); NewPing sonar3(TRIGGER_PIN3, ECHO_PIN3, MAX_DISTANCE); NewPing sonar4(TRIGGER_PIN4, ECHO_PIN4, MAX_DISTANCE); void setup() { Serial.begin(9600); } void loop() { delay(50); unsigned int uS1 = sonar1.ping(); pinMode(ECHO_PIN,OUTPUT); digitalWrite(ECHO_PIN,LOW); pinMode(ECHO_PIN,INPUT); Serial.print("Ping1: "); Serial.print(uS1 / US_ROUNDTRIP_CM); Serial.println("cm"); delay(1000); unsigned int uS2 = sonar2.ping(); pinMode(ECHO_PIN2,OUTPUT); digitalWrite(ECHO_PIN2,LOW); pinMode(ECHO_PIN2,INPUT); Serial.print("Ping2: "); Serial.print(uS2 / US_ROUNDTRIP_CM); Serial.println("cm");

ARDUINO SKETCH FOR BLUETOOTH CONTROLLING OF LED

Image
#include <SoftwareSerial.h> #define led 9 int state = 0 ; void setup () { Serial.begin( 9600 ); // put your setup code here, to run once: pinMode(led,OUTPUT); } void loop () { if (Serial.available() > 0 ) { state = Serial.read(); } if (state == '1' ) { digitalWrite(led,HIGH); } else if (state == '0' ) { digitalWrite(led,LOW); } else { Serial.println( "ur have entered something else inputs pls enter either 0 or 1" ); } }

THE LINK IS FOR THE PROJECT DOMESTIC ROBOT

https://drive.google.com/open?id=0B8kjWbGZFOgoQ2M0VUd0bmJCMGM https://drive.google.com/open?id=0B8kjWbGZFOgoaUhBZ25uR19UU28

THE CODE2 FOR SENSORS FOR DOMESTIC ROBOT......

//THE CODE2 FOR SENSORS FUNCTIONING // lowest and highest sensor readings: const int sensorMin = 0;     // sensor minimum const int sensorMax = 1024;  // sensor maximum int val = 0; #define led 13 #define l1  11 #define l2  8 #define buz 10 const int buzzerPin = 9; const int songLength = 18; int tempo = 113; int beats[] = {1,1,1,1,1,1,4,4,2,1,1,1,1,1,1,4,4,2}; char notes[] = "cdfda ag cdfdg gf "; // a space represents a rest void setup() {   // initialize serial communication @ 9600 baud:   pinMode(buzzerPin, OUTPUT);   Serial.begin(9600);   pinMode(led, OUTPUT); } int frequency(char note) {   // This function takes a note character (a-g), and returns the   // corresponding frequency in Hz for the tone() function.   int i;   const int numNotes = 8;  // number of notes we're storing   // The following arrays hold the note characters and their   // corresponding frequencies. The last "C" note is uppercase   // to separate it from

arduino sketch for the domstic robot

/*THIS IS THE CODE FOR THE ROBOT TO MOVE*/ #include<NewPing.h> #include <AFMotor.h> #include<SoftwareSerial.h> AF_DCMotor motor(1); AF_DCMotor motor2(2); AF_DCMotor motor3(3); AF_DCMotor motor4(4); float t1; float t2; float t3; float t4; #define MAX_DISTANCE 200 #define trig_pin  A0 #define echo_pin  A1 #define trig_pin2  A2 #define echo_pin2  A3 #define trig_pin3  A4 #define echo_pin3  A4 #define trig_pin4  13 #define echo_pin4  2 NewPing sonar1(trig_pin, echo_pin , MAX_DISTANCE); NewPing sonar2(trig_pin2, echo_pin2 , MAX_DISTANCE); NewPing sonar3(trig_pin3, echo_pin3 , MAX_DISTANCE); NewPing sonar4(trig_pin4, echo_pin4 , MAX_DISTANCE); int direction = 0; //String cmd, status, start, dontstart; void setup() {   Serial.begin(9600);   Serial.println("Motor party!");   // pinMode(status, OUTPUT);   pinMode(trig_pin, OUTPUT);   pinMode(trig_pin2, OUTPUT);   pinMode(trig_pin3, OUTPUT);   pinMode(trig_pin4, OUTP