DIY VOLTMETER USING ARDUINO ADC
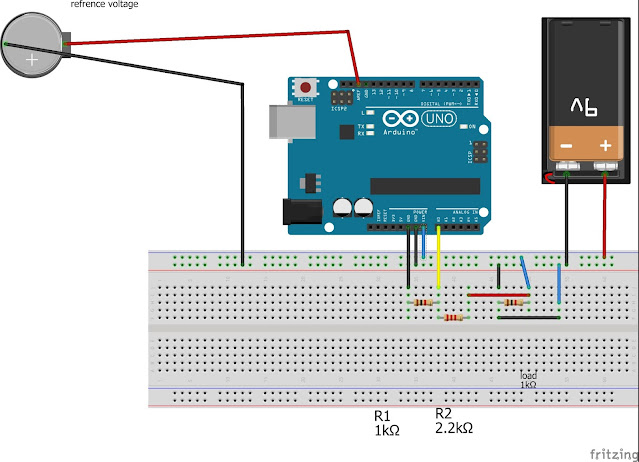
Vout = VIN
* (R1R2/R1+R2)
[NOTE: This voltage
“VOUT” should not have to be more than 5v, I recommend VOUT<less than 5V is safe
to use].
Sounds easy because it is, but V_IN cannot be measure hence
we need ADC to do trick, the 10-bit adc can measure any voltage between 0.5v –
5v , hence according to the voltage we’ll get somewhere between 0 to 1023 (2^10
=1024),
If we use 16-bit we have more resolution hence can even
measure precise and fine according to “NYQUIST_SAMPLERATE”, the UNO board have ADC
reference pin we can use it also to increase precision rate and decrease the
error rate. The ordinary 6000 count multimeter are good one can measure voltage
with +-0.1 error, the Arduino multimeter can also have -+0.1 precision.
Here the ADC voltage can be calculated by the is formula:
ADC voltage= (ref_Volt * adc_value) / 1024.0;
By default the Arduino have reference voltage as 5V but it is
not exactly precise hence to increase the precision use external voltage
reference voltage.
[NOTE: this reference external voltage should not
have to be more than 5v, I recommend <less than 5V that’s safe use a good
multimeter like fluke to supply 3 decimal precise voltage for reference to get
high precision.]
Here is the code:
1.     int adc_pin = A0;

2.     float adc_In = 0.0;

3.     float In_Volt = 0.0;

4.     float ref_Volt  = 3.321;

5.     int adc_value = 0;

6.     float R1 = 1000.0;

7.     float R2 = 2200.0;

8.     void setup()

 	{

9.     Serial.begin(9600);

10.    pinMode(adc_pin, INPUT);

11.        }

12.    float Measure()

13.  {

14.    adc_value = analogRead(adc_pin);

15.    adc_In = (ref_Volt * adc_value) / 1024.0;

16.    In_Volt = adc_In / (R2 / (R1 + R2));

17.    delay(1000);

18.    Serial.print("measured voltage is:");

19.    Serial.println(In_Volt, 5);

20.    //Serial.println(analog_Volt,5);

21     // Serial.println(analog_In);

22.    }

23.     void loop()

24.   {

25.     float Measure();

26.     }


good
ReplyDelete