Posts

Showing posts with the label ARDUINO

secrets of arduino atmega328p adc

Image
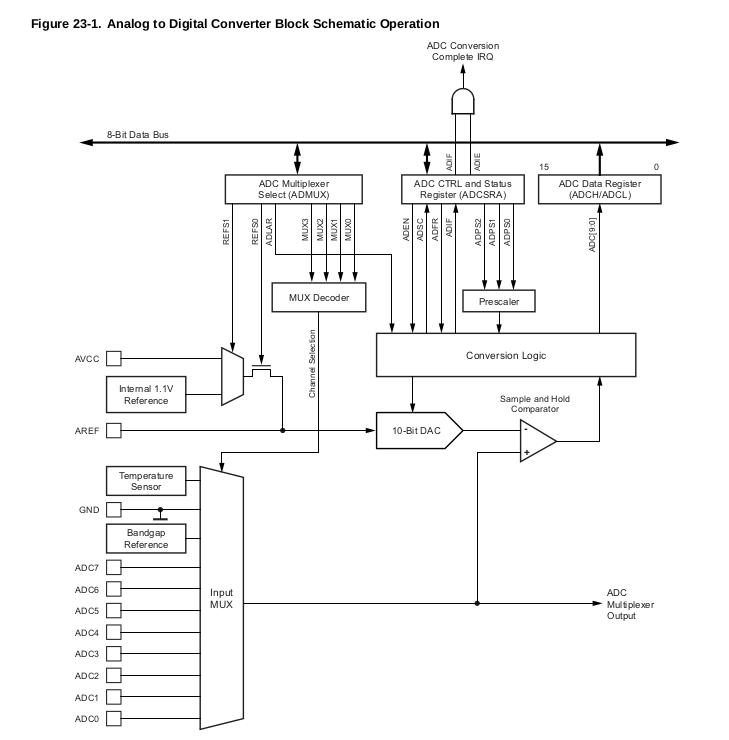
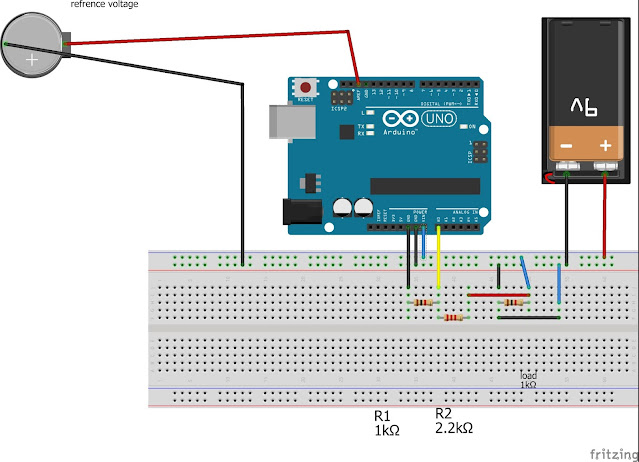
In this tutorials i'm gonna tell you all about the adc present in arduino famous boards like UNO,NANO,MINI....the atmega328p chips consist of the " 10-bit resolution adc " inside the uC. The type of adc is used in is  Successive approximation ADC . these are kind are slow but gives good resolution though. let's dig in registers of adc in atmega328p. To read analog input we need The reg " ADMUX ". T he adc reg have a Pin called AREF (adc reference voltage). The gives 10-bit number i.e 0-1023, 0-0V & 1023-5V. it measures using this formula       Vin = (Analog Ref * analogRead() ) / 1024 we need stable AREF voltage we can use internal 1.1V reference or we need to provide a stable voltage anywhere between 0.3V-5V externally. [NOTE: if ur are planning to provide external voltage to aref pin present on arduino uno,nano,mini, the recommended value is less than 5v to be safe on safe side cause the voltage of external 5v source may not be 5v exactly so if it i

HACK AND CLONE CAR KEY FOB, MY EPIC FAILURE...!!

Image
In this blog post i'm sharing my experience on cloning the my car key fob signal and how to do it properly. first things frist the cars now a days comes with a wireless remote key where u get atleast 2 or 3 options like lock,unlocking ,trunk(we call it as dickey!!!).....these options let your car access wirelessly and some cars are completly keyless for even driving. the keys of the cars are actually communicating with certain frequency like 433.xxxMHz or some countries uses 315.xxxMHz...the car companies uses an algorithm called " ROLLING CODES "...these are not that esay to crack cause they change every time u press key and once the key transmitted it cannot be used again... but a hacker named "samy kamakar" demonstrated an attack called REPLAY ATTACK where u simply transmitt the signal by recording the key fob away from car or blocking the signal and then recording. so this is how i've tried it..frist i needed to listen to the signals as possible in 10KHz

PYSERIAL WITH ARDUINO(comms with arduino from pc)

Image
In this post we're gonna learn about "pyserial"  python language library package to communicate or log data from arduino to pc (or) we can get rid of the serial port of arduino.H ence we do the same as we do in serial monitor. the module can be installed using pip   for linux: " sudo python -m pip install pyserial"   for windows : " pip install pyserial" here is a small arduino skecth for reading from terminal or cmd from arduino serial port code: import serial as sl #importing the serial lib as name sl import time mon = '/dev/ttyACM0' #declearing a variable for port name baud = 9600 #defining baud rate arduino = serial . Serial(mon, baud, timeout =. 1 ) while True : mon = arduino . readline() print ( 'the read data:,mon' ) #printing message for reading data from serial here is the python file for data loging code: import serial arduino_port = "/dev/ttyACM0" #serial port of Arduino ba

DIY VOLTMETER USING ARDUINO ADC

Image
This post helps to DIY yourself a high precision multimeter using Arduino. The UNO already comes with an excellent 10-bit ADC which is enough, but I recommend using an external ADC of 16-bit if you want to take it to serious measurement. But you don’t want you use it as replacement for a multimeter, buy a good multimeter instead of it. This Arduino based one is helpful for projects and static voltages that doesn’t change over the time.  We can create a voltage divider hence  We can measure voltage drop between the divider and hence multiply with resistance to get the VIN. Here I’m using a 1Kohm and 2.2KOHM resistance to measure max voltage of 5V. If want to measure the higher voltage use the following formula to adjust the resistors.   Vout = VIN * (R1R2/R1+R2) [NOTE:   This voltage “VOUT” should not have to be more than 5v, I recommend VOUT<less than 5V is safe to use]. Sounds easy because it is, but V_IN cannot be measure hence we need ADC to do trick, the 10-bit adc can mea

HOW TO IMPLEMENT PRECISE TIMED EVENT WITH ARDUINO

Image
Let us assume a situation where you want to blink an event at a precise moment with a trigger, while the Arduino doing other tasks and you want to prioritize the blink as important event. Well in order to do that you need timers help to time it precisely hence you need to use timer as interrupt to do that. The Arduino IDE default has a time function called “delay (microseconds)” it is pretty good and we can use it almost in many things, but it’s not precise and tends to shift some mill-seconds after sometime hence not reliable. That being said let’s see how we can implement a timer of Arduino to create a triggered event. The Arduino comes with two 8-bit timers, one 16-bit timer hence we can use the 16-bit timer to implement and triggered event. We are gonna use the TCCR1A and TCCR1B timer registers to implement. In the datasheet it is given clearly about how to implant it. The Timer/Counter (TCNT1), output compare registers (OCR1A/B), and input capture register (ICR1) are all

HOW TO WRITE YOUR OWN CODE FOR AN LCD DISPLAY (16X2 OR 16X4)

The Arduino ide default comes with an excellent library with examples for LCD display it’s really easy! One to use. Mine is not best one but the reason behind this post is to experience the feel of writing your own code and understanding the embedded displays and their working technology and how they works with u-controllers, maybe in future it can helps you to write a code for lcd display with other new microcontrollers or other programming languages. So let’s start with the one important things: The datasheet is your friend in this quest for any quest, for real! So getting the data sheet is important here I’m using a 16x2 LCD. This kind LCD is based on parallel interface LCD controller chip from Hitachi called the HD44780. Next is physical pinout the display uses a matrix of dots and displays only characters in 16x2 matrixes. Each character is displayed in a 5 column × 8 row dot matrix or a 5 column × 10 row dot matrix The pinout is LCD has totally 16 pins they are: 1.