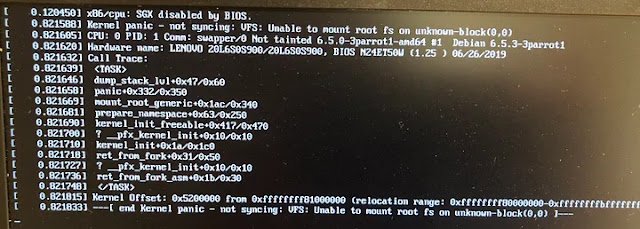
"Kernel Panic” error After upgrading Parrot OS
This guide will walk you through the steps of resolving the kernel panic error that you may encounter after upgrading your Parrot OS kernel to version 5.6.0.
Step 1: Enter Recovery Mode
- Restart your computer and enter the GRUB menu by pressing the appropriate key during the boot process. The specific key may vary depending on your computer's manufacturer and BIOS settings. Common keys include F2, F10, Delete, or Esc.
- Once in the GRUB menu, select "Advanced Mode" using the arrow keys and press Enter.
- In the Advanced Mode menu, locate the entry for Parrot OS 6.1 and select "Recovery Mode" using the arrow keys. Press Enter to boot into Recovery Mode.
Step 2: Purge Problematic Packages
- Once in Recovery Mode, log in as root using the default credentials.
- Open a terminal window by selecting "Drop to root shell prompt" from the Recovery Mode menu.
- Execute the following command to purge the problematic packages:
- Press Enter to confirm the removal of these packages.
sudo apt purge xtrx-dkms r8168-dkms realtek-rtl8188eus-dkms Step 3: Update and Upgrade
- After purging the problematic packages, update and upgrade the system using the following commands:
- Press Enter to proceed with the update and upgrade process.
sudo apt update && sudo apt upgradeStep 4: Locate Parrot OS Partition
- Once the update and upgrade process is complete, identify the Parrot OS partition using the following command:
- Carefully examine the output of the `fdisk -l` command to identify the correct partition number for your Parrot OS installation.
sudo fdisk -lStep 5: Mount the Partition
- Mount the identified Parrot OS partition using the following command, replacing `{your disk partition}` with the actual partition number you found in Step 4:
- Press Enter to mount the partition.
sudo mount /dev/sda{your disk partition} /mntStep 6: Update Initramfs
- Update the initramfs using the following command:
- Press Enter to proceed with the initramfs update.
update-initramfs -u -k 6.5.0–3parrot1-amd64Step 7: Update GRUB
- Update GRUB using the following command:
- Press Enter to update GRUB.
sudo update-grubStep 8: Reboot
- Restart your computer by issuing the following command:
sudo reboot -h now
Worked for me, thank you!
ReplyDelete